ARE Truck Cap Struts Won't Stay Up? Here's the Fix
If your ARE truck cap’s lid won’t hold itself open anymore — sagging halfway down or dropping suddenly while you’re reaching for gear — you’re dealing with worn-out gas struts. Those small cylinder-and-piston assemblies are the only thing keeping the cap propped up, and when they lose pressure, the lid becomes a safety hazard.
This guide walks through why truck cap struts won’t stay up, how to confirm it’s the struts and not the hinge, and the step-by-step fix. We’ll also cover which replacement struts match your ARE model and how to avoid the same failure next time.
Why Gas Struts Fail on Truck Caps
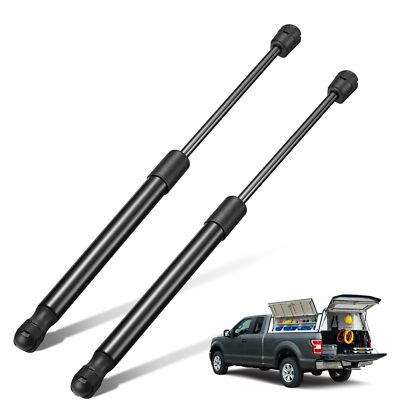
Gas struts are sealed cylinders filled with pressurized nitrogen. Over time, that seal degrades — especially if the cap sits in direct sun or goes through freeze-thaw cycles. Once the seal leaks even a tiny amount, internal pressure drops and the strut can’t support the cap’s weight anymore.
Heat accelerates seal breakdown. Parking in the sun every day shortens strut life by months. Cold doesn’t crack the seal as quickly, but repeated expansion and contraction from temperature swings still weakens the rubber gasket inside the rod end.
Physical damage matters too. If you’ve accidentally bent a strut by forcing the cap closed with something wedged under the lid, the piston rod can score the inner wall of the cylinder and let gas escape. Once the rod is scratched, the strut won’t hold pressure no matter how new it is.
How to Tell It's the Struts and Not the Hinge
Open the cap halfway and let go. If it drops immediately or sinks slowly over a few seconds, the struts have lost pressure. If the cap stays at that exact height for a full minute, the struts are fine — look at the hinge instead for binding or a bent mounting plate.
Push the cap all the way up and feel for resistance. A working strut resists compression when you push the rod in by hand. If the rod slides in and out with almost no resistance, that strut is dead.
Check both struts separately. It’s common for one to fail before the other, so the cap might tilt to one side when you open it. If one side drops faster than the other, that strut is the culprit — but replacing both at the same time prevents the second one from failing a month later and forcing you to do the job twice.
Tools and Parts You'll Need for Replacement
You’ll need a 10mm socket or wrench, a flathead screwdriver to pry the old strut’s ball-socket clips off, and a pair of replacement struts that match your cap’s extended force rating. ARE struts are spec’d by newtons or pounds-force — the number stamped on the old strut’s cylinder tells you which replacement to order.
Matching the Correct Strut Force
Using a strut rated too weak means the cap won’t stay up. Using one rated too strong makes the cap slam open and puts stress on the hinge. Measure the old strut’s extended length and check the force marking on the cylinder body — ARE’s replacement parts catalog lists struts by model and year, so you can cross-reference the exact match.
If the cylinder is too rusted to read the rating, measure the cap’s weight and calculate the force needed. A typical fiberglass cap weighs 150-200 pounds — split that across two struts, then add 20% to account for the cap’s center of gravity being ahead of the struts’ pivot point. That gives you the per-strut force in pounds.
Step-by-Step Strut Replacement Process
Prop the cap open with a stable support — a broomstick wedged between the bed rail and the cap’s inside edge works, or have a second person hold it. Do not let the cap rest on your head while you work underneath.
Locate the strut’s two mounting points: one ball-socket end clips onto a stud welded to the cap’s frame, and the other clips onto a bracket at the bottom near the rear glass. Pry the plastic retaining clip off the ball socket with a flathead screwdriver — it’ll pop free once you lift the edge. Repeat for both ends of the strut.
Installing the New Strut
Slide the new strut’s ball socket onto the lower bracket stud first, then compress the strut slightly to align the top end with the cap-frame stud. Push the socket onto the stud until you hear the clip snap. Tug the strut to confirm both ends are locked — if either pops off, the clip didn’t seat fully.
Remove the prop and test the cap. It should lift smoothly and hold itself at any position above halfway. If it still drops, double-check that both new struts are the correct force rating and that the ball sockets are fully clipped onto the studs.
Preventing Future Strut Failure
Park in shade when possible. UV exposure is the single biggest accelerant of seal degradation — a cap that lives under a carport will see struts last twice as long as one parked in full sun.
Keep the strut rods clean. Dirt and grit on the piston rod act like sandpaper every time the strut cycles, scoring the cylinder wall and breaking the seal. Wipe the rods down with a damp cloth every few months, especially if you drive on dusty job sites.
Don’t force the cap shut if something’s in the way. If you bend a strut rod even slightly, the internal seal will leak within days. The ARE DCUMax aluminum frame design keeps the mounting studs rigid, so struts aren’t fighting a flexing bracket — but no frame will save a strut from being bent by brute force.
Restoring Safe, Hands-Free Cap Operation
Replacing worn gas struts is a fifteen-minute job that eliminates the safety risk of a suddenly-dropping truck cap lid. Once you’ve confirmed the struts are the issue and not a bent hinge, the fix is straightforward — match the force rating, clip the new struts onto the existing studs, and test the hold before putting tools away.
Keeping strut rods clean and parking out of direct sun when possible will extend the replacement set’s life well past the typical two-year mark. If the cap still won’t stay up after installing correctly-rated new struts, inspect the hinge and mounting brackets for damage — but in most cases, fresh struts restore that smooth, stay-open lift immediately.
Common Questions About Weak Truck Cap Struts
You can, but the other strut will likely fail within a month or two. Struts wear at the same rate since they experience identical load cycles — if one has lost pressure, the other is close behind. Replacing both now saves a second trip under the cap and ensures even lift.
The cap will slam open violently and put stress on the hinge over time. Struts rated too strong also make the lid harder to close, since you’re fighting more upward force. Stick to the OEM force rating stamped on the old strut’s cylinder.
If struts are failing in under a year, heat or physical damage is accelerating wear. Check whether the cap sits in direct sun for hours every day — that can cut strut life to six months. Also inspect the piston rods for scratches or dirt buildup that scores the cylinder wall.
No. The nitrogen seal inside the cylinder isn’t user-serviceable — once it leaks, the strut is done. Attempting to drill and refill the cylinder will destroy the internal valve and leave you with a strut that doesn’t compress at all.
Yes. Aluminum caps weigh more than fiberglass, so they require higher-force struts to hold the same open angle. Always match the replacement strut’s force rating to your specific cap model — using a fiberglass-rated strut on an aluminum cap will leave the lid sagging.
Open the cap and look at the strut’s angle relative to the cap frame. If the ball socket sits crooked on the stud or the strut leans outward instead of straight, the mounting bracket is bent. A bent stud will cause even new struts to bind and lose pressure quickly.